In Stata 8, graphs are drawn in a separate window and the size of an exported PNG image is identical to the size of the graph window. To create images of a specific size, for example 500 by 400 pixels, it is necessary to repeatedly resize the graph window, export the graph, and check the size of the PNG file with an image viewer.
With Stata 9.1, released on 15 September 2005, and later versions, it is possible to specify the size of graphs that are exported to PNG format with the width(#) and height(#) options (see Stata help for png_options). However, the method described in this article offers some advantages because it can create graphs that are antialiased.
The alternative method to create PNG files was suggested to me by Stata technical support: export the graph from Stata to a PostScript file and convert this file to a PNG image. The conversion from PostScript to PNG format can be done with a free software package called Ghostscript. By using Stata in combination with Ghostscript it is possible to automate the creation of PNG files that have specific dimensions and that are antialiased. The difference in image quality is shown in the two figures below.
PNG graph exported from Stata
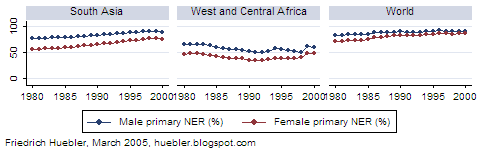
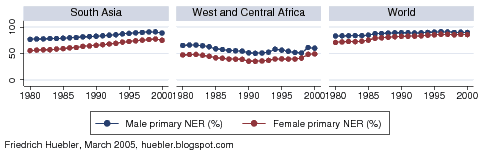
The graph above was directly exported from Stata in PNG format with the graph export command. The graph below was exported from Stata as a PostScript file and then converted to PNG format with Ghostscript. The quality of the text is better in the PNG file created by Stata. On the other hand, the trendlines in the image created by Ghostscript appear smoother because Ghostscript supports antialiasing.
PNG graph converted from PostScript format
Ghostscript is released in two versions with different licences, as AFPL Ghostscript and GPL Ghostscript, but since July 2006 both versions are based on the same code. Download Ghostscript, install it on your computer, and identify the path to the Ghostscript executable. You can then adapt the Stata do-file below to create a PNG image. The example uses the auto dataset that is part of Stata to create a scatter plot with the dimensions 500 by 400 pixels.
Stata do-file to create a PNG graph with Ghostscript
* Load datasetAfter the dataset is loaded, several options for exporting to PostScript are set. The width and height of the image are controlled with the pagewidth and pageheight options. Here, the options specify a graph 5 inches wide and 4 inches high. For an explanation of the other options type whelp ps_options in Stata.
sysuse auto
* Set options for PostScript export
graph set ps pagesize custom
graph set ps pagewidth 5
graph set ps pageheight 4
graph set ps tmargin 0
graph set ps lmargin 0
graph set ps logo off
graph set ps fontface Helvetica
* Draw graph and export to PostScript file
scatter mpg weight, xsize(5) ysize(4)
graph export "scatter.ps"
* Convert PostScript file to PNG format
#delimit ;
shell "C:\Program Files\gs\gs8.56\bin\gswin32c.exe"
-dSAFER -dBATCH -dNOPAUSE
-r100 -g500x400 -sDEVICE=png16m
-dGraphicsAlphaBits=4 -dTextAlphaBits=4
-sOutputFile="scatter.png" "scatter.ps";
The scatter command draws the graph. The width and height are again specified in inches, this time with the xsize and ysize options. The graph is then exported to a PostScript file.
Finally, Ghostscript is called with a shell command. At this point you have to enter the path to the Ghostscript executable on your computer. Identify the location of gswin32c.exe (by default, Ghostscript is installed in "C:\Program Files\gs\") and enter the full path in quotes following the shell command. The size of the graph is specified with the options -r100 (the resolution in pixels per inch) and -g500x400 (the dimensions of the PNG graph). The options -dGraphicsAlphaBits=4 and -dTextAlphaBits=4 control the antialiasing. The option -dGraphicsAlphaBits=2 sometimes works better because straight lines are less blurred; the PNG graph above was in fact created with -dGraphicsAlphaBits=2. The filename of the PNG graph is set with the -sOutputFile switch, and the filename of the PostScript source follows last.
The commands above were tested under Windows XP with GPL Ghostscript 8.56 and Stata versions 8.2, 9.2, and 10.
Related articles
- Guide to integrating Stata and external text editors
- Guide to creating maps with Stata
- Guide to reading Statalist with Gmail
- Ghostscript, Ghostview and GSview
- Ghostscript page at SourceForge.net
- Wikipedia article on anti-aliasing
- Stata software
Permanent URL: http://huebler.blogspot.com/2005/04/creating-png-images-with-stata.html


No comments:
Post a Comment